User Tools
Setting up Open Broadcast Software Studio™ (OBS Studio)™
Congratulations on selecting OBS Studio™ This tutorial will show you how to set up OBS Studio™ on your computer and configure it to work with your Light Cast Media account. The provided screen shots are from OBS Studio™ Version 18.0.1 and should work on all version releases of OBS Studio with minor screen and option changes.
OBS Studio™ is a free product brought to you through open source licensing. To avoid unofficial software, please go to https://obsproject.com/ and only use links provided through their site.
If you already have OBS Studio™ installed on your computer, please open OBS Studio™ and go to Help, then Check for Updates. All updates are free. Please make sure you have the newest release of the software installed for maximum reliability and all the newest features.
Step 1 –
Connect a video camera or video playback device using an appropriate cable matching the output of your device into the input of your computer. (see manufacturer’s instructions).
Turn on the device and allow enough time for the device or camera to fully boot into operational mode. This must be done prior to launching OBS Studio™. If your devices have not had time to fully boot, the devices may not be detected.
Step 2 –
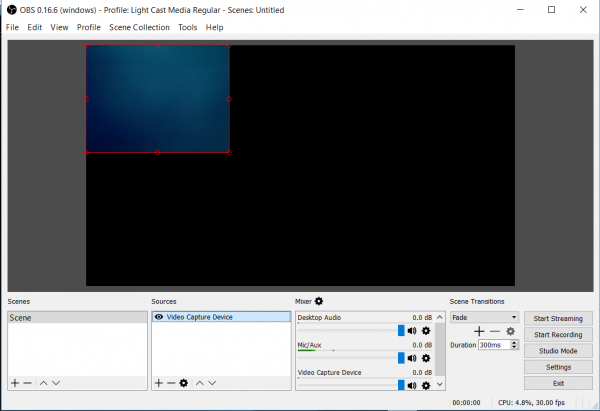
Open OBS Studio™. If this is your first time using OBS Studio™, on a Mac, simply click on – (BRAD SUPPLY MAC INSTRUCTIONS). If on a PC launch the application from the desktop. Once the software has loaded, you should see a scree like the one below:
Step 3 –
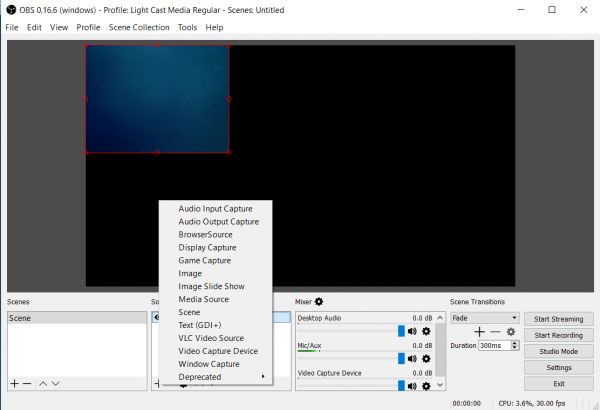
Click on the plus symbol located below “Sources”. This will activate the menu to select your different inputs. Select video capture device. This will open a window with a drop down. Select your video capture device from the list.
Step 4 –
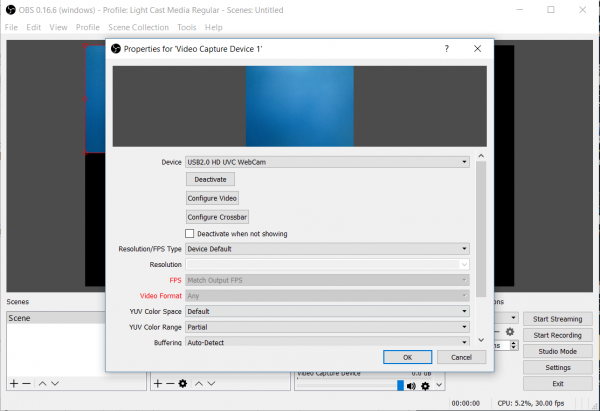
You should now see a Properties window for your device. If this window did not automatically open, click on your device name.
OBS Studio™ requires the output from your camera to match your input on your capture device. These settings need to also match the settings in the Properties window. Please make the necessary changes. Once you have made these changes, you should be able to see your video input from your camera on the main OBS Studio™ screen.
If you need to configure your audio separately, repeat the steps for adding an audio source.
Step 5 – Setting up the stream
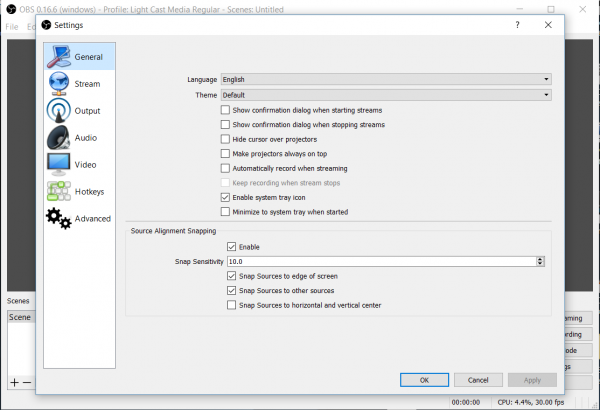
Click “Settings” , located in the lower right corner. You should now see a window like the one below.
Now we need to enter the streaming address and stream name. Log in to your Light Cast Media account. Go to Media, then Consoles. Locate the console you are wanting to setup and click the Webcam icon to the right of the Console name. Here you will locate the Publish Path (Address). It will start with RTMP. Highlight and copy this line of text. Now go back to the OBS Studio™ and paste into the URL field
Go back to your web browser that has your Light Cast Media account open and on the line below, you will see the Stream Name. Copy this line of text and paste it into OBS Studio™ where it asks for Stream Key.
Click “Apply”, then click “OK”
Step 6 -
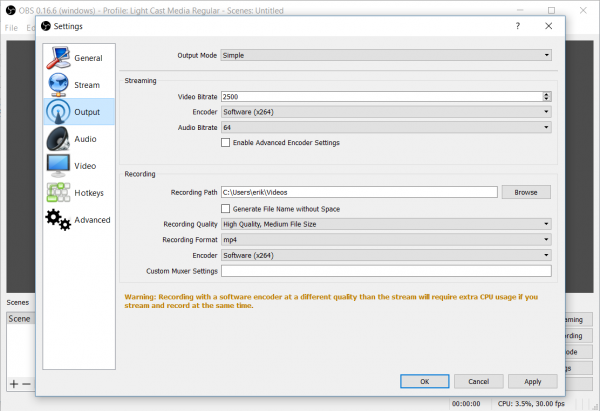
Now Select “Output”. You should see a screen like the one below.
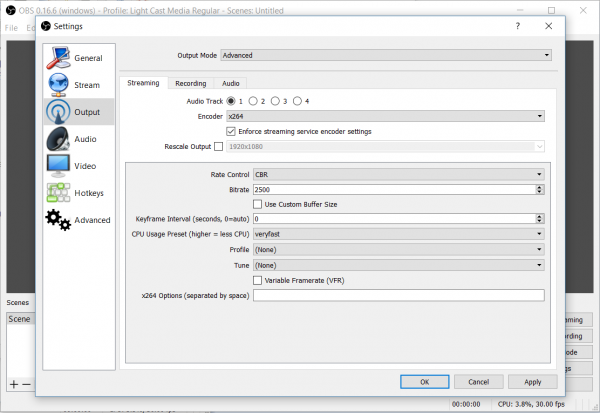
Select “Advanced” in the Output Mode. You should now see a screen like this.
Now, lets make the following changes:
- Encoder: X.264
- Set output size and check the box next to “Rescale Output”
Set your height and width to a display size that matches your export ratio. If you are using standard definition (or 4:3 aspect ratio) and need help selecting a size, “click here”. If you are using 16:9 aspect ratio and need help selecting a size, “click here”.
- Select your bitrate
When selecting a bitrate, we can provide you guidance based on the display size. Please use our “bitrate calculator” if you need assistance selecting a bitrate.
CAUTION: Do not attempt to stream at a higher total bitrate than your internet connection speed can provide. If you are unsure of your upload speed, use http://www.speedtest.net to confirm your actual available upload speed.
Even the best internet provider can have the occasional congestion. To avoid it effecting your stream, it is recommended that you stay within 80% of your rated internet upload speed. *
- Key frame interval should be set every 150 frames (or 5 times the frames per second rate)
Click “Apply”, then click ”OK”
Step 7
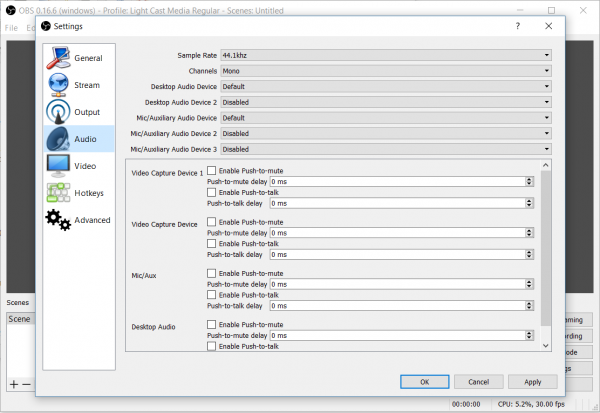
Select “Audio” from the list on the left. You should now see a screen like the one below:
Check to confirm the audio rate is 44.1 khz. Select either Mono or Stereo.
Click “Apply”, then click “OK”
Step 8 -
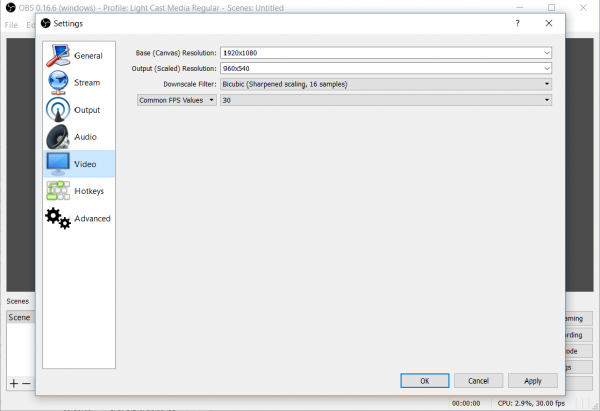
Select “Video” from the list on the left. You should now see a screen like the one below:
Check your image “Base Resolution” and “ Output Resolution”
Set “Common FPS Values” to 30 FPS (do not select a fractional frame rate)
Click “Apply”, then click “OK”
Step 9 –
Testing your settings. Locate the ‘Start Streaming’ button on the lower right. Click “Start Streaming”. You should now be streaming to the Light Cast Media CDN. If you see an error message, please write down the message and contact support at 866-506-4019 x 2 to help troubleshoot your settings.
If you do not have an error message and you see your stream working in OBS Studio™, go to your Light Cast Media account. Go to Media and then Consoles. Click on the Preview icon. You should see your content being streamed in the Preview window.
Once you see your content streaming, go to “Embedding your Video” tutorial for help creating your embed code.
* If you are streaming Live and are having trouble, stop the encode, reduce the bitrate & restart the encoder.
